

Installing a drip irrigation system is one of the smartest ways to keep your garden healthy while saving water. Unlike traditional watering methods, drip irrigation delivers water directly to the roots, helping plants grow stronger and reducing water waste. Whether you have a small backyard garden, raised beds, or a larger vegetable patch, learning how to install drip irrigation can make a big difference in plant health and efficiency.
With a properly planned to Install drip irrigation system, you can enjoy water efficiency, reduce labor, and even prevent common plant problems like overwatering or uneven soil moisture. This guide will walk you step-by-step through choosing components, laying out your system, and maintaining it for long-lasting results.
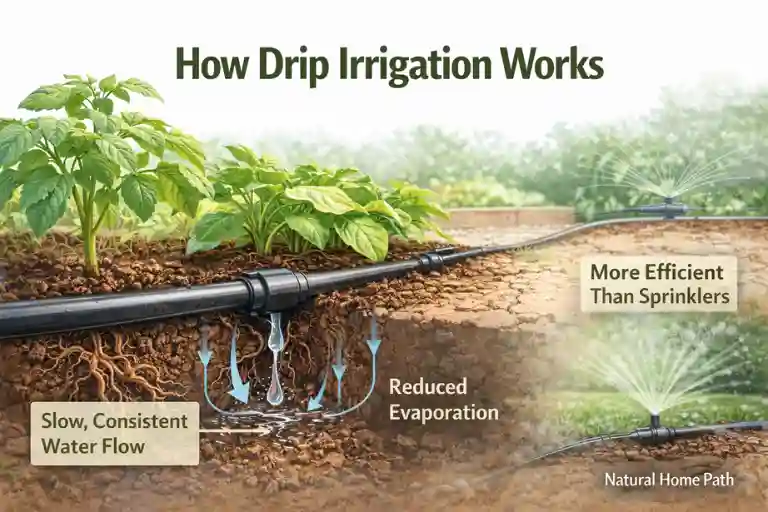
How Drip Irrigation Works
A drip irrigation system works by delivering water directly to plant roots through emitters and tubing. Unlike sprinklers that spray water broadly, drip systems release water slowly and consistently, which improves water efficiency and reduces evaporation. The water flow is usually controlled with a pressure regulator to ensure each plant gets the right amount. Some systems use smart irrigation controllers or timers to automate watering, saving time and effort. To install drip irrigation, you provide steady moisture, which promotes healthy plants and prevents disease caused by overwatering. Whether you have a small garden or a larger field, understanding how the system works is key to planning an effective drip irrigation installation.
Benefits of Installing Drip Irrigation
Installing drip irrigation comes with many advantages for gardeners. First, it saves water by delivering it directly to the plant roots, minimizing waste. It also promotes healthy plants since consistent moisture reduces stress and prevents root rot. Deep watering encourages stronger root growth, leading to more productive gardens. Drip systems reduce weeds by keeping surrounding soil dry and save time and labor, especially for busy gardeners. You can also integrate fertilizer with irrigation (fertigation), providing nutrients directly to plants efficiently. Whether you’re planting vegetables, flowers, or shrubs, installing a drip irrigation system ensures better growth while using fewer resources, making your garden greener, healthier, and more cost-effective.

Types of Drip Irrigation Systems
1. Surface Drip Irrigation Systems
Surface drip systems use flexible tubing laid directly on top of the soil. Small holes or emitters release water slowly near the base of plants. This system is easy to install and adjust, making it ideal for home gardens, raised beds, vegetable rows, and container plants. Because the tubing is visible, it’s simple to inspect for clogs or leaks and modify the layout as plants grow or seasons change.
2. Subsurface Drip Irrigation Systems
Subsurface drip irrigation places drip tubing below the soil surface, delivering water straight to plant roots. This method reduces evaporation, minimizes weed growth, and keeps foliage dry, which helps prevent disease. It works best for trees, shrubs, lawns, and long-term crops where the layout won’t need frequent changes. Although installation is more involved, subsurface systems are highly efficient and low maintenance once set up.
3. Micro-Spray Drip Systems
Micro-spray systems use small spray heads attached to drip tubing that distribute water over a wider area. They produce a fine mist or gentle spray, making them perfect for flower beds, ground covers, young plants, and closely spaced crops. These systems provide more coverage than standard emitters but still use less water than traditional sprinklers.
4. Emitter-Based Drip Systems
Emitter-based systems rely on individual drip emitters placed near each plant. Each emitter releases a precise, slow flow of water, allowing moisture to soak deeply into the root zone. This setup is excellent for individual plants, fruit trees, shrubs, and potted plants, where consistent and controlled watering is essential. Emitters come in different flow rates to match specific plant needs.
Essential Drip Irrigation Components and Tools
Core System Components
These parts form the backbone to install any drip irrigation setup:
- Main tubing (drip line or poly tubing) – Carries water from the source to planting areas and distributes it throughout the system.
- Emitters (drippers) – Release water slowly and directly to plant roots, ensuring precise and efficient watering.
- Connectors and fittings – Include elbows, tees, couplers, and end caps used to join tubing sections and customize the layout.
- Filters – Remove dirt and debris from the water to prevent emitters from clogging and ensure consistent flow.
- Pressure regulators – Control water pressure to protect the system from damage and maintain even water delivery.
Automation & Control (Optional but Helpful)
These additions improve convenience and water efficiency:
- Timers – Automate watering schedules and ensure plants receive water at the right time.
- Smart irrigation controllers – Adjust watering based on weather, soil moisture, or plant needs for maximum efficiency.
Installation Tools
These tools make setup faster and easier:
- Tubing cutter or sharp scissors – Provide clean, accurate cuts for proper fitting connections.
- Punch tool – Creates precise holes in tubing for installing emitters.
- Stakes or ground anchors – Secure tubing in place and keep lines organized.
- Water source connector – Attaches the system to a hose bib, faucet, or main water line.
Helpful Accessories
Optional items that improve performance and maintenance:
- End caps or flush valves – Allow easy system flushing and cleaning.
Planning Your System
Before installing a drip irrigation system, planning is crucial. Start by mapping your garden layout and dividing it into zones based on plant type and water needs. Measure distances for tubing and identify where emitters will go. Check water pressure and plan for pressure regulators if needed. Consider integrating smart irrigation controllers for automation. Proper planning prevents leaks, uneven watering, and wasted resources. Planning ahead also allows you to expand your system in the future. By carefully designing your drip irrigation installation, you ensure water efficiency, healthier plants, and a system that works smoothly for years. Good planning saves time and makes the installation process much easier.
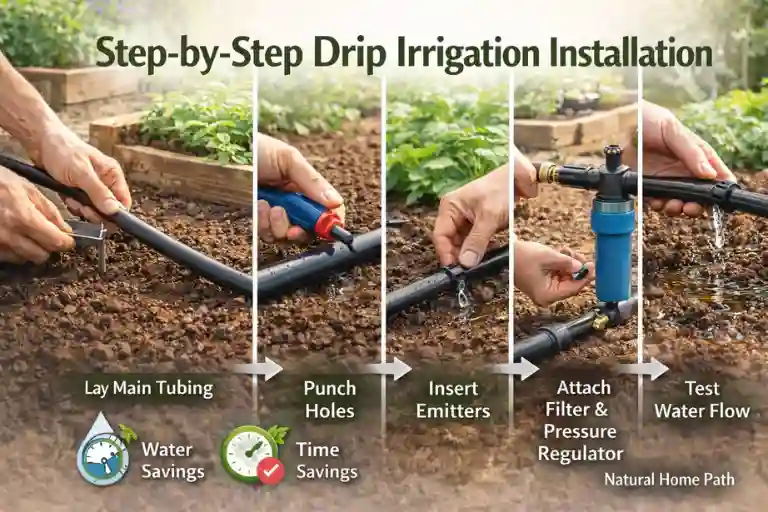
Step-by-Step Installation
Installing a drip irrigation system can be easy if you follow a clear, step-by-step approach. Here’s how to do it efficiently:
Step 1: Prepare Your Garden: Clear debris, weeds, and rocks from your planting area. Level the soil and plan the layout of your drip system to match plant rows and zones. Proper preparation ensures even water distribution.
Step 2: Lay the Mainline Tubing: Place the main tubing along the planned path. This is the backbone of your drip irrigation system, carrying water from the source to all areas of your garden.
Step 3: Install Laterals and Emitters: Connect lateral lines to the mainline, and attach emitters at each plant’s root zone. This ensures precise watering exactly where your plants need it.
Step 4: Add Filters and Pressure Regulators: Install filters to prevent clogs and pressure regulators to maintain consistent flow. These components are key for a durable and efficient to install drip irrigation system.
Step 5: Test Your System: Turn on the water and check for leaks, uneven watering, or dry spots. Adjust emitters as needed so every plant receives the right amount of water.
Step 6: Final Adjustments and Optimization: Secure tubing with stakes, double-check emitter placement, and make small tweaks for optimal coverage. This step ensures your drip irrigation installation is effective and long-lasting.
Maintenance & Troubleshooting
Maintaining a drip irrigation system keeps it running efficiently. Regularly clean filters and emitters to prevent clogging. Check tubing for leaks and replace damaged parts immediately. Seasonal adjustments, like winter shutdown or summer expansion, ensure plants get the right water at the right time. Troubleshoot common problems such as uneven watering, low pressure, or blocked emitters. Integrating smart controllers can help monitor system performance automatically. Consistent maintenance prolongs the life of your drip system, keeps your garden thriving, and maximizes water efficiency. A well-maintained system ensures your plants stay healthy, saves you labor, and prevents common irrigation mistakes.
Advanced Techniques
Once your basic drip irrigation system is up and running, you can take your garden to the next level with these advanced techniques:
- Fertigation: Deliver nutrients directly through your drip system by mixing fertilizer with water. This ensures plants get nutrients efficiently and promotes healthier, faster growth.
- Rain and Moisture Sensors: Install sensors to automatically stop watering during rain or when the soil is already moist. This saves water and prevents overwatering.
- Smart Irrigation Controllers: Automate your watering schedule based on soil moisture, weather conditions, or time of day. Ideal for busy gardeners or larger gardens.
- Raised Beds & Container Gardens: Adapt your drip irrigation for raised beds or pots by using shorter tubing and customized emitter placement.
- Long-Term Crops: Customize emitter flow and tubing layout for trees or perennial plants that need consistent, deep watering.
These techniques help your drip system use water efficiently, boost plant health, and make gardening easier and more productive.
Cost, Time, and DIY vs Professional
Installing a drip irrigation system can fit various budgets. DIY setups are cost-effective and ideal for small gardens, while hiring professionals may be better for large or complex layouts. Costs depend on tubing, emitters, filters, and optional smart controllers. Installation time ranges from a few hours for small gardens to a full day for larger setups. DIY projects save money but require careful planning. Professionals save time and ensure proper layout and flow. Understanding costs and labor helps you decide the best approach. Regardless of choice, installing drip irrigation is an investment in healthy plants, water efficiency, and long-term garden success.
Common Mistakes to Avoid
Avoiding mistakes ensures your drip irrigation system works efficiently. Common errors include uneven watering, poor layout, clogged emitters, and ignoring maintenance. Overwatering or underwatering can harm plants, while skipping pressure regulation causes inconsistent flow. Failing to clean filters or check tubing can shorten system life. Planning carefully, testing the system, and adjusting emitters as needed prevent problems. Using the correct components, maintaining the system regularly, and monitoring plant health will make your drip irrigation installation successful. By learning from these common mistakes, gardeners can save water, protect plants, and enjoy a thriving, hassle-free garden.
Frequently Asked Questions
How do I know if my garden is suitable for drip irrigation?
Most gardens, whether small vegetable beds or larger flower plots, work perfectly with a drip irrigation system. Evaluate your plant types and layout, and plan zones to ensure even watering.
How much water will my drip system actually save?
A properly installed drip system can save up to 50% more water compared to sprinklers, because water goes directly to the roots without wasting any on surrounding soil.
Can I expand my system later?
Absolutely! Drip irrigation is flexible—just add more tubing, emitters, or zones as your garden grows.
How do I prevent clogging in my drip system?
Regularly clean filters and flush tubing. Using high-quality emitters reduces blockage and keeps your drip system efficient.
Conclusion
Installing a drip irrigation system is a simple, efficient way to save water and grow healthy plants. By planning carefully, choosing the right components, and following the step-by-step guide, you can enjoy a garden that thrives with minimal effort. Regular maintenance, troubleshooting, and optional advanced techniques like fertigation and automation make the system even more effective. Whether you choose a DIY approach or professional installation, a well-designed to install drip irrigation system improves water efficiency, reduces labor, and ensures a flourishing garden year-round. Start planning your drip system today and experience the difference it makes for your plants and the environment.